Vlaad


Admirable
Legendary Hero
ghost of the past
|
 posted March 26, 2006 04:45 PM
 |
bonus applied. |
Edited by Vlaad on 26 Mar 2006
|
Mapmaker's Compendium (links and tools)
Instead of answering some questions on mapmaking over and over again, I thought we could assemble a sort of FAQ topic.
If you are a beginner, here's hoping you might find these links and tools useful. If you are a veteran, you have probably seen and used them already, so feel free to add a tip or two to newcomers. 
In order to download some of the files you'll need to register at Fileplanet and/or get a yahoo account (both are free).
The utilities usually come with READ ME files, so check them out! 
Finally, be sure to get the latest versions, as some programs are updated from time to time.
Most of these (and more!) can be found at Laelth's homepage, too! 
H4Util by Slava Salnikov
It allows you to copy part of maps, make a dump file, create a script C-like file that may be edited and then processed again.
You can write a script for your map in a regular text file and then process it, which is more useful than "writing" the script from the Map Editor.
The latest version (2.4) allows the conversion of Gathering Storm maps to the Heroes IV standard format, and auto-decoration to be applied to specific sections of the map.

Looks messy, huh? (Well, the first line is just some old WoG 3.57 advertising  ) )
The commands you need are c, s etc. I presume those are DOS, so try your Start>Programs>Accessories>Command Prompt.
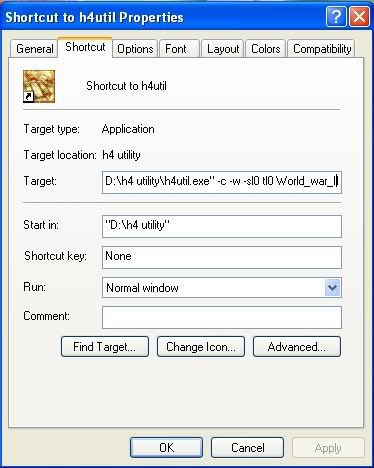
The other way would be to create a shortcut for your H4UTIL (by right-clicking) on your desktop.
Place the maps in the same directory as H4UTIL (it would be best to create two simple test maps the first time ).
When you've done that, you have to edit the shortcut's properties. Change this string
"D:\h4 utility\h4util.exe"
with the command(s) you need!
Let's follow the FAQ for an example:
Quote:
To copy the whole level of the source map (yyy.h4c) to the target (xxx.h4c) one use:
H4UTIL -c -w -sl1 tl0 xxx.h4c yyy.h4c
This will copy the underground (1) level of the map 0 of yyy.h4c to the ground (0) level of the map 0 of xxx.h4c
Important. The point of reference is the upper right corner. So the copied part will be located at that place.
The X coordinate heads from the left top corner (0) to the right bottom one.
The Y coordinate heads from the right top corner (0) to the left bottom one.
All objects, terrain and elevating are copied. All original objects are deleted.
If you copy a part of a map and process a script, the copying is executed first.
The modified campaign will be saved with the next name: xxx1.h4c
To copy a part of the source map (yyy.h4c) to the target (xxx.h4c) one use:
H4UTIL -c -w -sm0l0X50Y20x70y24 tm0l1X30Y90 xxx.h4c yyy.h4c
This will copy a rectangular part of map 0 of yyy.h4c from 50*20 to 70*24 to the underground of map 0 of xxx.h4c at 30*90 (the right top corner of copied piece).
The modified campaign will be saved with the next name: xxx1.h4c
In other words:
"D:\h4 utility\h4util.exe" -c -w target.h4c source.h4c -sm*l*X*Y*X*Y* -tm*l*x*y*
In the end you should get a new file named target1.h4c
Just don't forget to replace * with appropriate numbers!
m - map number if you have a campaign
l - ground (0) or underground (1)
X and Y - coordinates
 If I am right, then If I am right, then
h4util -c -w YourMap.h4c OtherMap.h4c -sl0 -tl0 should result in YourMap1.h4c file
Once you've completed the first two steps, drag the map(s) over the shortcut!
DISCLAIMER: It's been aaages since I used any of this, so I am sorry if I'm mistaken.
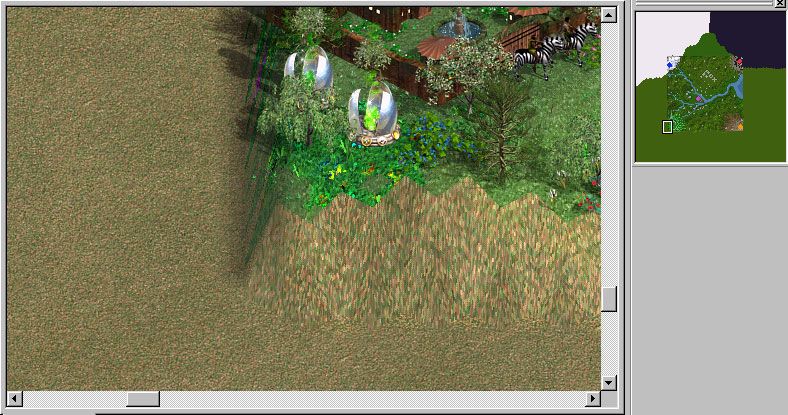
As far as I remember, by copying part of one map onto another you could get features such as this "cliff":
You could also design your adventure map based on the minimap picture:
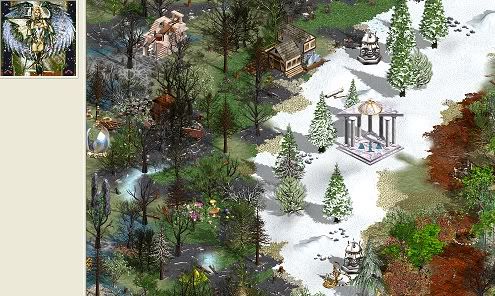
in his masterwork called “Angels Are Back”, Ururam Tururam has created a dazzling mini-map
A graphical user interface called for this program (called H4Runner ) is also available.
You can find both versions HERE.
Heroes Minimapper by DaMaGepy
The program captures the minimap from the map editor's screen to bmp.
It captures 2 pictures (because in the editor the gray rectangle covers the part of the map so it requires 2 independent screenshots) and saves the picture with a black frame as BMP.
The program is, for one, user-friendly!
You can download it from HERE.
Object Editor by GrayFace
Another powerful tool for mapmakers is the Object Editor made by Sergey.
It enables altering the nature of ANY object with very few limitations: you can change yellow and red squares, place all objects underneath others (make them part of the ground), even use some lost def files.
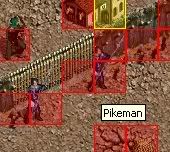
a town gate with the guards
Since it works with all the expansions and mods for Heroes III, it is a must for every mapmaker.
Until its FAQ is updated, here's part of instructions written by Fnord:
Quote:
1. In the Map Editor, place the object you want the final object to
LOOK like. e.g., if you want a Peasant to LOOK like a Faerie Dragon, put a
Faerie Dragon on the map.
2. Click on the object you've placed on the map so that it's selected.
3. Click the *COPY* icon in the tool bar (or Copy in the Edit menu or
press Ctrl-C).
4. Switch to the Object Editor.
5. In the Object Editor, click the PASTE button. The name beside
Picture and Type will change to your object.
6. Now, look closely in the Object Editor where it says "Appearance".
The first item is "Picture" and beside it is a white box with the DEF
file name of your pasted object. Next to this is ".def" and next to that
are TWO Button Icons - the First icon button means COPY and the Second
means PASTE.
7. Click the COPY Icon described above.
8. Now, switch back to the Map Editor.
9. Place the object that you want the final object to actually BE.
e.g., if you want a Peasant that looks like a Faerie Dragon, put a PEASANT
on the map.
10. Click on the object you've placed on the map so that it's selected.
11. Click the *COPY* icon in the tool bar (or Copy in the Edit menu or
press Ctrl-C).
12. Switch to the Object Editor.
13. In the Object Editor, click the PASTE button (NOT the Paste icon).
The name beside Picture and Type will change to your object.
14. Now in the Object Editor, click the Paste ICON (beside the Copy
icon beside the .def line). The name beside Picture (but not Type) will
change back to the first object.
15. Click the Object Editor's COPY button (NOT the Copy icon).
16. Switch to the Map Editor.
17. Click the Map Editor's *PASTE* icon in the tool bar (or Paste in
the Edit menu or press Ctrl-V).
18. You're done! Save your map and have fun.
TIP: After you paste an edited object into the Map Editor you can copy
and paste it within the Map Editor itself to make multiple copies.
You can get it from ByteBandit's H3 Archive group.
Map Review Utility by TNT
Our new member has created a small program that will help you rate maps you have and review them. The project is in the alpha phase, and the author promises he'll create an "upgrade" if the users think it does any good. Project Archive (MapReviewSystem.zip) can be found at his yahoo group.
The WoG mod and ERM tools
A large number of Heroes III fans moved on to WoG (short for In the Wake of Gods), a great mod created five years ago by Slava Salnikov and his international team.
1) ERM Scripter
The latest version of ERM Scripter for WoG with Windows ERM help in HPL format. You can get it from the old WoG site(s).
2) ERM Script Master - the latest version (1.1.2.7) of ERM Script Master for WoG.
It's a very useful tool with friendly GUI interface for modifications many parameters of the game.
You can change all parameters of monsters and edit any square of battle field at your own opinion without knowing ERM!
You make some mouse-clicks only and this program will generate all your wishes automatically. Then, you have to just copy and paste generated ERM script into your map. Paste it into a global (timed) event. Copy the entire code, from ZVSE to the end. Make sure that you disable all colours from receiving the event and/or change the event day to something like 500 or later to avoid the ERM script popping up as if it were a regular event message.
If you are not familiar with WoG and ERM, here's a sample:
ZVSE
!?OB3/33/0;
!!HE-1:A2/40/0/?v1000;
!!IF&v1000=1:M^%Z400, you seem to have the armor? Perhaps you are the one I have been waiting for.^;
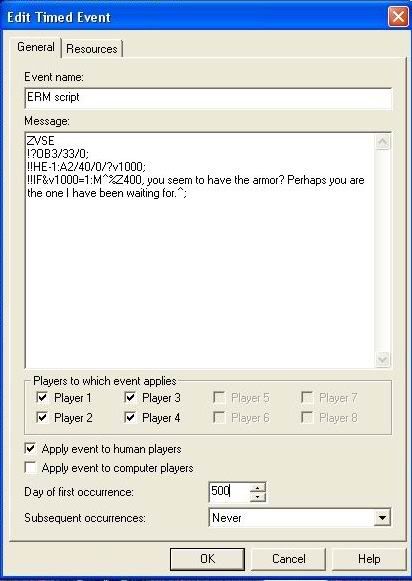
Translated into English, this reads:
This is an ERM script.
If any hero visits the object at 3/33/0,
check if he has the artifact and set the flag.
If the flag is true, display the message: "(name of the hero), you seem to have the armor? Perhaps you are the one I have been waiting for."
What are all those numbers?!
3/33/0 are the coordinates of the object (0 means it's on the surface)
-1 means "any"
2 means "check"
40 is the dragon scale armor
v1000 - the flag used here
%Z400 - stores the name of the visiting hero
etc
Some of them you can find in the WoG help files, others you choose and set.
Other symbols stand for ERM triggers (!?) and receivers (!!) :
OB - object
HE - hero
M - text message
etc
You can learn how to use them reading the Help Files.
ERM is NOT a complicated language; I studied literature at university, but ERM reminded me of Basic I used to learn back in primary school... so it took me several hours to write my first script. I still write rather simple scripts, mind you, but they add a number of unique features to my maps... and it's fun. You can change ANYTHING in the game, and I mean ANYTHING.
If you need further help with ERM, post your questions in this thread.
The latest help file for beginners has been written by TNT and uploaded to his yahoo group.
Even you have no time to study ERM, you can simply choose your favorite options in the WoGify Menu and save them as the settings for your scenario.
Here's what the WoG 3.58 READ ME file says on this matter:
Quote:
Just follow these simple instructions:
a) Open the WoG Options menu and select the options you wish to use.
b) Save the file to the Maps folder with a custom file name. It's generally simplest to
use a name similar to your map name. So if your map is named "Conquer the World.h3m",
you might call this "Conquer the World.dat".
c) Create a timed event in your map (you can name it anything).
d) Set the event so it won't trigger for any players and set the event day to 600.
e) In the event body, put the following (assuming you used "Conquer the World.dat"):
ZVSE
!#UN:J3/^maps\Conquer the World.dat^;
f) Click OK to save the event.
g) Save your map.
h) When you zip your map to email to someone (or to upload to a web site), be sure to
include your custom wog options file too (e.g., Conquer the World.dat).
Now whenever anyone plays the map it will automatically load your customized WoGify Options
file and will use those options for your map instead of whatever options the player normally
plays with.
You could combine your custom scripts and the pre-done scripts by copying them all into Timed Events, but be careful. Here's a piece of advice from Qurquirish Dragon:
Quote:
Standard WoG scripts often use ".ert" files to allow regionalization of text in the scripts. As a result, if you copy one of these into the map itself, you will have numerous "text not found" messages when these scripts run. If the corresponding script is active in the WoG options, and you WoGify the map, then you will not see these errors when playtesting. However, if you only WoGify random maps, then you will see the problems. My suggestion to all WoG map designers is that you do one of the following:
Either (a) be certain to use localized scripts (ones without the ERT z-variables), or (b) supply a WoG Options file along with the map. Then, in the documentation, state that you should WoGify the map with that option list.
The second option is best if you want to use any of the premade scripts, as you don’t have to check for errors in copying scripts.
More useful files for Heroes III players, modders and mapmakers alike are availabe at ByteBandit's Archive groups!
Brushes for Heroes IV
You can add any kind and number of objects and layers that you like, even include events and customize them afterwards, overlap towns or enable heroes to move through the "void terrain" - best shown in Vel’s "A Beautiful Land":

Forget the pre-done sets – they are good for covering huge areas with grass only. Instead, create your own brushes!
Custom Portraits
Perhaps you want to create a unique RPG scenario and customize even the hero's apperance? It's easier than you might think!
Here's a short FAQ* written by Fnord:
Quote:
Step 1 : Create or download a portrait
A portrait consists of two differently-sized graphics files in PCX format (256 colours only). One file is used for the larger portrait picture, and the other for the smaller one (such as the one that appears in the list of heroes opposite the list of towns on the main display).
The large file must be 58x64 (58 pixels wide and 64 pixels high).
The small file must be 48x32 (48 pixels wide and 32 pixels high).
If you download a file from the site, it will be a zipped file containing both a large and small version, both of which must be renamed.
On the web site are also "packs" of files, one for each town type. The pcx files in the pack files are already named to replace the corresponding original heroes portraits.
If you choose to make a portrait yourself (for example, by taking a photograph or drawing and using that), you will need an image editor. I use Corel Photopaint 9, which lets me copy a section of the image to a new document, resample it to the appropriate number of pixels and then convert it to 8-bit palleted colour mode (256 colours). I can then export it in PCX format. If you don't have a good image editor, you might prefer to stick with pre-done portraits. (You can use also Photoshop or Paint Shop Pro)
Step 2:
Copy both files to the Hereos3\Data subdirectory
Step 3:
*Rename the files to match the internal names of an existing heroes portrait*
The name for the large portrait will be Hpl###xx.pcx where ### is a 3-digit code for the specific hero and xx is a two-digit code for the hero type.
The name for the small portrait will be Hps###xx.pcx.
You can replace any portrait with any new portrait. So you could replace a knight picture with a picture of a necromancer if you desire. It's up to you.
The hero code and number range is:
sh = special heroes (000-008)
el = elementalist (000-007)
pl = planwalker (000-007)
kn = knight (000-007)
cl = cleric (008-015)
rn = ranger (016-023)
dr = druid (024-031)
al = alchemist (032-039)
hr = demoniac (056-063)
dm = heretic(048-055)<!--- be carreful, 3DO inversed
nc = necromancer (072-079)
ov = overlord (080-087)
wl = warlock (088-095)
br = barbarian (096-103)
bm = battlemage (104-111)
bs = beastmaster (112-119)
wh = witch (120-127)
?? = more special heroes (128-132)
The help page showing you exactly which hero has which number or you can just experiment yourself.
Examples:
To replace the 3rd necromancer hero portrait with a new one, name the two pcx files: Hpl075nc.pcx and Hps075nc.pcx.
These new files will sit in your data directory and can be removed, renamed or changed at any time.
Step 4
You can now run Heroes and see the new portraits appearing, replacing the original ones. Or you can run the editor and change a portrait of a hero (like you normally would) to another one.
Additional info at Bruno's Modhomm3 page!
WARNING: Be sure to back up your original portraits and warn the players to do the same!!!
You can find a set of pre-done portraits at ByteBandit's Archive groups, and a different one at Gangrail's old WoG site.
With WoG, you can upload your custom picture from your Heroes Data folder, using a simple command:
As for Heroes IV, use H4 Face Kit (read more HERE).
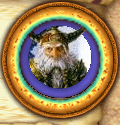
Do you recognize this mad wizard?
The Equilibris team usually keeps the tool updated at their downloads page.
______________________
P.S. For any further information on mapmaking, please check out other articles available at MapHaven and Celestial Heavens.
P.P.S. *A short FAQ... Heh heh, sounds funny.
____________
|
|


